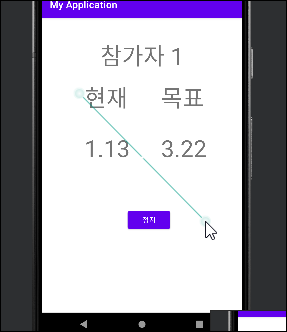
안드로이드 스튜디오 어플에 블라인드 넣기입니다. 어제에 이어서 하겠습니다. 어제는 stage 2까지 블라인드를 쳤습니다. 그런데 문제가 생겼어요. stage 3에서는 숫자가 보여야 하는데, 이어서 블라인드 처리가 되었습니다.
추가를 해보겠습니다. 어제 만들었던 것들 참고해서 이어가보겠습니다.
if (isBlind == false) {
    abc_1.text = (sec.toFloat() / 100).toString()
} else if (isBlind == true) {
    abc_1.text = "???"
어제 블라인드가 트루일 때 만들었던 내용입니다.
하지만 이렇게 하니까, 다음까지??? 가 나와서 추가를 앤드를 넣어보겠습니다.
runOnUiThread {
    if (isBlind == false) {
        abc_1.text = (sec.toFloat() / 100).toString()
    } else if (isBlind == true && stage == 2) {
        abc_1.text = "???"
    }
원래라면 그냥 돼야 하는 것 같은데, &&앤드를 추가로 더 넣어하네요.
그냥 이대로 하시면 됩니다.
true에 &&를 추가하세요.
또한 아래와 같이 스테이지 3에도, 글자가 보이게 다시 넣어야 합니다.
} else if (stage == 3) {
    abc_1.text = (sec.toFloat() / 100). toString()
기존
else if (stage == 3) {

    timerTask?.cancel()
    val point = (abs(sec-num).toFloat())/100
    point_list.add(point)
변경
else if (stage == 3) {
    abc_1.text = (sec.toFloat() / 100). toString()

    timerTask?.cancel()
    val point = (abs(sec-num).toFloat())/100
    point_list.add(point)
이런 식으로 완료를 하였습니다.

이제 스테이지 3에도 숫자가 보이죠? 이런 식으로 만들었습니다.
이제는 트루와, 펄스를 토글로 해서, 블라인드를 켜고, 끼는 것으로 만들어보겠습니다.
스타트 화면 올 볼까요?
여기에서 토글을 넣어보는 게 좋겠죠?

이런 식으로 버튼을 하나 만들고, 버튼 이름을 btn_blind로 적어두었습니다.
이제 하다 보니까 눈에 익죠? 아이디 입력입니다.
val btn_blind : Button = findViewById(R.id.btn_blind)이 것을 start에 추가합시다.
또한 버튼 클릭을 했을 때, 어떤 동작이 이루어져야겠죠? 그것도 추가하겠습니다.
btn_blind.setOnClickListener {}이곳에 넣으면 되겠습니다.
btn_blind.setOnClickListener {
    isBlind = !isBlind
    if (isBlind == true) {
        btn_blind.text = "Blind 모드 ON"
    } else {
        btn_blind.text = "Blind 모드 OFF"
    }
}
이런 식으로 넣었습니다.
버튼을 클릭했을 때, 블라인드와 블라인드가 아님을 해달라고 넣어죠.
블라인드가 트루일 때는, 글자도 블라인드 모드 온으로 되어있게 하고,
다른 경우 블라인드 모드 오프로 해달라고 넣었습니다.
class MainActivity() : AppCompatActivity() {
    var p_num = 3
    var a = 1
    val point_list = mutableListOf<Float>()
    var isBlind = false


    fun start(){
        setContentView(R.layout.activity_start)
        val abc: TextView = findViewById(R.id.text_pnum)
        val btn_minus: Button = findViewById(R.id.btn_minus)
        val btn_plus: Button = findViewById(R.id.btn_plus)
        val btn_start: Button = findViewById(R.id.btn_start)
        val btn_blind: Button = findViewById(R.id.btn_blind)

        btn_blind.setOnClickListener {
            isBlind = !isBlind
            if (isBlind == true) {
                btn_blind.text = "Blind 모드 ON"
            } else {
                btn_blind.text = "Blind 모드 OFF"
            }
        }

        abc.text = p_num.toString()


        btn_minus.setOnClickListener{
            p_num --
            if (p_num == 0) {
                p_num = 1
            }
            abc.text = p_num.toString()
        }
        btn_plus.setOnClickListener{
            p_num ++
            if (p_num == 4)
            { p_num = 3}
            abc.text = p_num.toString()
        }
        btn_start.setOnClickListener{
            main()
        }
    }


    fun main() {
        setContentView(R.layout.activity_main)

        var timerTask: Timer? = null
        var stage = 1
        var sec: Int = 0

        val abc: TextView = findViewById(R.id.text_pnum)
        val abc_1: TextView = findViewById(R.id.text_time)
        val abc_2: TextView = findViewById(R.id.text_point)
        val abc_3: TextView = findViewById(R.id.text_people)
        val btn: Button = findViewById(R.id.btn_start)

        val random = Random()
        val num = random.nextInt(1001)

        abc.text = ((num.toFloat()) / 100).toString()
        btn.text = "시작"
        abc_3.text = "참가자 $a"

        btn.setOnClickListener {
            stage++
            if (stage == 2) {
                timerTask = kotlin.concurrent.timer(period = 10) {
                    sec++
                    runOnUiThread {
                        if (isBlind == false) {
                            abc_1.text = (sec.toFloat() / 100).toString()
                        } else if (isBlind == true && stage == 2) {
                            abc_1.text = "???"
                        }
                    }
                }
                btn.text = "정지"

            } else if (stage == 3) {
                abc_1.text = (sec.toFloat() / 100). toString()

                timerTask?.cancel()
                val point = (abs(sec-num).toFloat())/100
                point_list.add(point)

                abc_2.text = point.toString()
                btn.text = "다음"
                stage = 0

            } else if (stage == 1) {
                if (a < p_num) {
                    a++
                    main()
                } else {
                    end()
                }
            }
        }
    }
            fun end() {
                setContentView(R.layout.activity_end)
                val text_end2: TextView = findViewById(R.id.text_end2)
                val text_end3: TextView = findViewById(R.id.text_end3)
                val btn_end1: Button = findViewById(R.id.btn_end1)

                text_end3.text = (point_list.maxOrNull()).toString()
                var index_last = point_list.indexOf(point_list.maxOrNull())
                text_end2.text = "참가자" + (index_last+1).toString()

                btn_end1.setOnClickListener(){
                    point_list.clear()
                    a = 1
                    p_num = 3
                    start()
                }
            }


    override fun onCreate(savedInstanceState: Bundle?) {
        super.onCreate(savedInstanceState)
        start()
     }}
이 것이 최종 완료판이네요.
블라인드 온으로 했을 때입니다.


블라인드 오 프로 했을 때입니다.


잘 나오죠?
이로서, 안드로이드 스튜디오 어플에 블라인드 넣기(앱#21) 끝!!
안드로이드 스튜디오 어플 만들기 다른 것들도 봐주세요!
안드로이드 앱에 블라인드 넣기(앱#21)
블라인드 모드를 만들어봅시다. 물론 목표가 정확하게 보이는 것도 좋고, 현재 시간이 보이는 것도 좋죠. 하지만 현재 시간이 안 보여서, 진짜 감으로 맞춰야 하는 것이 어떻까요? 오늘은 그런
lucky1004.com
안드로이드 어플 종료화면 만들기(앱 만들기#20)
이제는 종료 화면을 만들어 보려고 합니다. 레이아웃에서 ctrl c + v로, 처음 화면 start를 만들었던 것처럼 end를 만들어 보겠습니다. 그리고 내용을 다시 복귀겸, 싹 지워보고 다시 만들어보겠습니
lucky1004.com
android studio설치 다운로드하기 안드로이드 앱 만들기#1
android studio설치 다운로드하기 안드로이드 앱 만들기#1
안드로이드 스튜디오 설치 다운로드하기 안드로이드 앱 만들기#1입니다. 오늘부터 코딩에 대해서 좀 배워보려고 합니다. 코딩에서 어떤 것을 먼저해볼까요? 그래도 저희가 가장 원하고, 그리는
lucky1004.com
'코딩 어플만들기' 카테고리의 다른 글
| 안드로이드 스튜디오 색 변경하기 (버튼, 배경) 앱#22 (0) | 2022.04.07 |
|---|---|
| 안드로이드 스튜디어 스탑워치 로직 완성!! (0) | 2022.04.06 |
| 안드로이드 앱에 블라인드 넣기(앱#21) (0) | 2022.04.03 |
| 안드로이드 어플 종료화면 만들기(앱 만들기#20) (0) | 2022.04.01 |
| 안드로이드 어플 시작화면 만들기 (앱만들기#19) (0) | 2022.03.30 |


